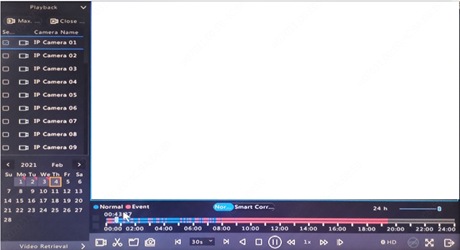
Step 1. Right-click on the mouse at the multi-window live view page. Find【Playback】, click and access the Playback page.

Step 2. At the left side of the Playback page, select the camera and date you preferred, then you should be able to watch the recordings of a specific camera for a specific time.
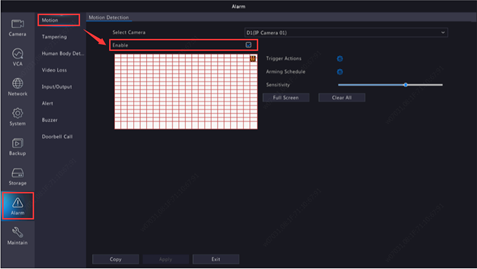
When motion detection is enabled, alarm occurs if an object inside the detection area moves to a certain extent (see Motion Detection for more details). Motion detection alarms can trigger actions including recording and snapshot.
Step 1. Click 【Alarm】>【Motion】, enable motion detection. Select the desired camera and tick Enable. Use the mouse to draw a detection area, and drag the slider to set detection sensitivity, target object size, and duration. The higher the sensitivity, the more likely a moving object will be detected.
Step 2. Configure motion detection recording: click right to Trigger Actions, click the Recording tab, select the desired camera, and then click OK.
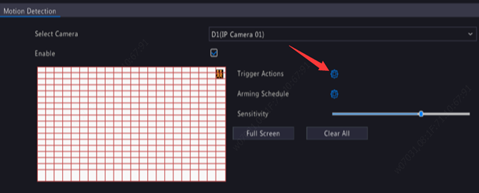
Note: Please make sure the selected camera is triggering the same camera for recording.
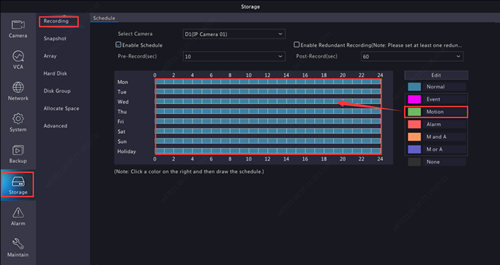
Step 3. Set up recording schedule. Go to 【Storage】>【Recording】, select camera, enable schedule, click on the green box on the right side, then drag the mouse to draw the schedule all the way from left to right.
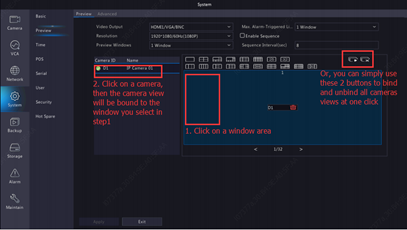
Each preview window (window for short) links to a camera. By default, window 1 links to camera D1, window 2 links to camera D2, and so on. You may want to change the link to display live video from a camera in another specified window.
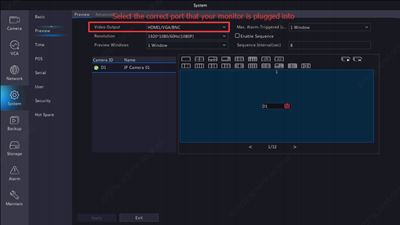
Step 1. Select the correct video output first, it’s the port that your monitor is connected to.
Step 2. Set preview windows, which refers to the multiple windows layout displayed on monitor live view.

Step 3. Click window 1 on the right, and then click D1 under Camera on the left. Now D1 appears in window 1. Click Apply to save the settings.
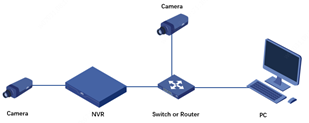
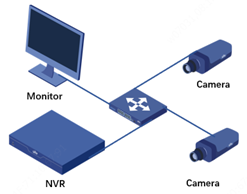
Step 1. Hardware connection and topology:
Step 2. Configuration:
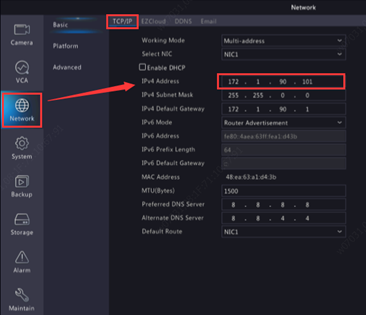
A. Please make sure that the IP address of all cameras and the NVR are in the same network segment.
Note: The NVR may have multiple IP address, it depends on which NIC is selected and which Ethernet port the cameras are connected to.
The IP address of NVR can be found in 【Network】>【TCP/IP】
If you need to change the IP address of camera then please refer to FAQ
B. Click 【Add All】 to add all the discovered IP devices allowed (depending on channel numbers supported by the NVR).
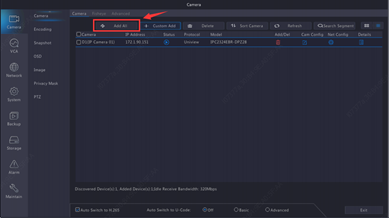
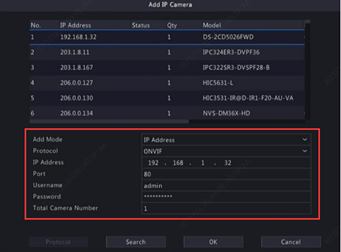
C. Click 【Custom Add】. In the pop-up window as displayed below, enter the IP address and complete other settings, and then click Add. You may also click Search Segment and add discovered cameras in the list.
Step 1. Connect your device to the same local network with your PC
Step 2. Change the IP address of your device to the same network segment of your PC.
The IP address of the device can be found and modified by using EZTools. Please download the EZTools by clicking the link below.
(https://www.gyration.com/UploadFiles/CyberView_Tools.zip )
Step 3. Open Internet Explorer, enter the IP address of your device at the address bar.
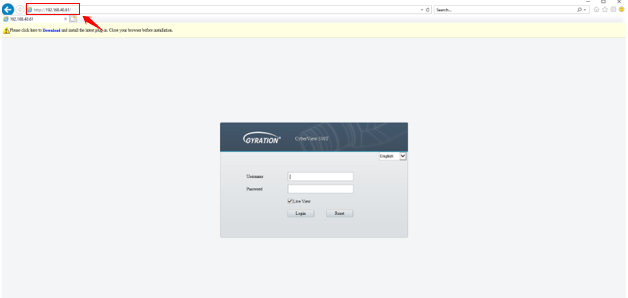
Step 4. Plugin installation is required. when logging in for the first time or after firmware upgrade, it will prompt a message saying that please install the latest plugin
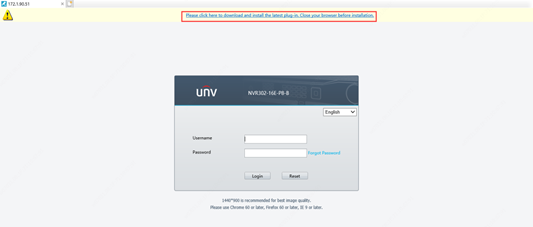
After installing the plugin properly, you can log in.
If there is a monitor connected to NVR, the NVR system date can be found on the monitor, as shown in the picture below.

Connect a monitor to the NVR through a VGA or HDMI cable, and a mouse to the USB port of the NVR.
The default username/password is admin/123456
We can also access into the web interface of NVR via Internet Explorer on a PC. And Internet Explorer (9.0 or later version) is highly recommended.
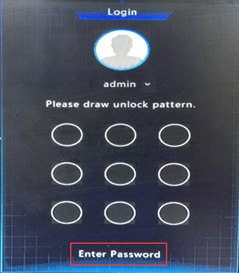
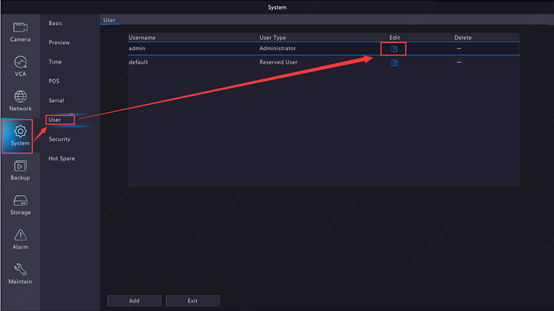
Log into the NVR on the monitor, go to 【System】>【User】,click on the ‘Edit’ icon on the admin user row, input the login password. And then on the pop-up window, you will see an option named ‘Enable Unlock Pattern’, please untick it and click on ‘OK’.
Log into your NVR on the Monitor, go to【System】>【Basic】>【Basic Setup】, untick ‘Enable Password Protection’ and click on ‘Apply’, and the login password will be disabled.

You can click on ‘Enter password’ on the unlock pattern page and use the login password to log in.